12 Mar 2017
I first spoke about this technique at the Game Developers Conference (GDC) in 2017 and the slides for that presentation can be found here. The idea is to take everything that is good about simple quantization and super charge it. Since simple quantization is generally a foundation for the other algorithms, this new variant can be used just as well for the same purpose.
It is worth noting that the algorithm I presented used uniform segmenting as well as range reduction both per clip and per block.
The key insight is that with simple quantization, using a hard coded bit rate is very naive and overly simplistic. We can do better, here’s how!
Variable Bit Rate
In the real world, the nature of the data can change quite dramatically from clip to clip, track to track, or even within a track through time. It is thus important to have a solution that can properly adapt to ever changing environmental conditions. A variable bit rate solves this problem for us.
It is ideal for our hierarchical data. As previously mentioned, our bone track data is stored in local space of their parent bone. This means that each bone incurs a small amount of error as a result of the lossy compression and this error will accumulate as we go down the hierarchy. The error accumulates because we need our final bone transforms in world space to perform skinning and thus the final error is visible on our visual mesh. This makes it obvious that bones higher up in the hierarchy such as the root and pelvis will contribute more error and thus require more bits to retain higher accuracy while on the other hand, bones further down such as finger tips or leaf bones do not require as many bits to maintain the same accuracy. A variable bit rate nicely solves this for us.
It is not unusual for some tracks within a clip to be exotic or to vastly differ from the others. Those tracks might require many more bits to retain sufficient accuracy or perhaps they might need far fewer. Again a variable bit rate is ideal for thus.
Some tracks can vary quite a bit through time as well. For example, during a cinematic it is quite common for all characters to be animated simultaneously. However not all characters might be visible on the screen at the same time. Characters that are not visible would typically remain animated but simply not move and thus their animation data remains constant during this time. A variable bit rate again allows us to exploit temporal coherence.
How It Works
As we saw with simple quantization, it is very common for the bit rate to be hardcoded. Instead, we want our bit rate to vary and adapt and it thus makes sense to calculate it in some way.
Per Clip
One morning, I realized that it might not be all that hard to try and brute force all bit rates within a certain range and find the smallest value that met some defined accuracy threshold. This allowed fast clips to use more bits when they were needed and slower clips to use fewer while still maintaining high accuracy.
A bit rate was considered superior to another if it was lower (yielding a lower memory footprint) and the accuracy as measured with our error function remained within an acceptable threshold.
Per Track Type
Not long after, I got thinking and realized that each track type is very different. Their units are different and the data also behaves very differently. It thus made sense to attempt and brute force every bit rate for each of our three track types: rotation, translation, and scale. I thus ended up with three bit rates per clip instead of a single value. It later became obvious that if I can do this per clip, I can also do it per block trivially and thus ended up with three bit rates per block. The added overhead was very small compared to the huge memory gains.
Per Track
It soon dawned on me that ideally, we wanted to find the best bit rate for each track within each block. The holy grail of our variable rate solution. Unfortunately, the search space for this solution is massive and it is no longer practical to perform a brute force search. A common character clip might easily have 50 to 80 tracks that are animated and each track can have one of several bit rates.
To solve this problem, we needed to find a smart heuristic.
The Algorithm
To trim the search space, I opted for a two phase approach: the first phase finds an approximate solution while the second phase refines it to a local minimum. This is an important distinction, the following algorithm does not find the globally optimal solution, instead it settles on an acceptable local minimum. It perhaps could be further improved.
The Search Space
In order to keep things simple, I settled on 16 possible bit rates that we used internally: 0, 3, 4, …, 16, and 23. These are the number of bits per track key component (e.g. per quaternion component). We need a higher value than 16 in some uncommon cases such as world space cinematic clips where the accuracy needs of the root are very high. As I mention in my presentation, 23 bits might have been chosen prematurely. The idea was to use the same number of bits as the floating point mantissa minus the sign bit but as it turns out, in order to de-quantize, we must be able to accurately and uniquely represent our quantized integers as 32 bit floating point numbers. Sadly, they can only accurately and uniquely represent integers up to 6 significant digits. The end result is thus that we have some rounding happening. I do not know wether or not this is a real issue or not. Perhaps 19 bits might be a more sensible choice. More work is required here to find the optimal value and evaluate the impact of the rounding.
We do have one edge case: when a track has 0 bits per component. This means our track is constant within our evaluation range and when this happens, we no longer need the track range information within that particular block since our range extent is now 0. We instead store our repeating constant key value within the 48 bits we had available for our range. This allows us to use 16 bits per component for our constant key.
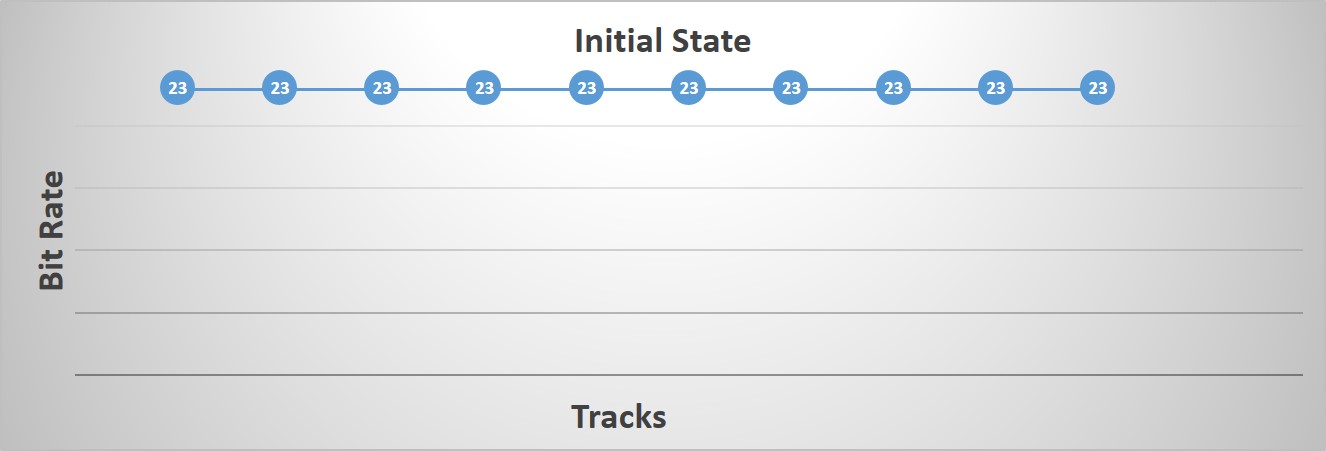
Initial State
In order to start our algorithm, we first initialize all our tracks to use the highest bit rate possible. The goal of the algorithm being to lower these values as much as possible while remaining within our accuracy threshold.
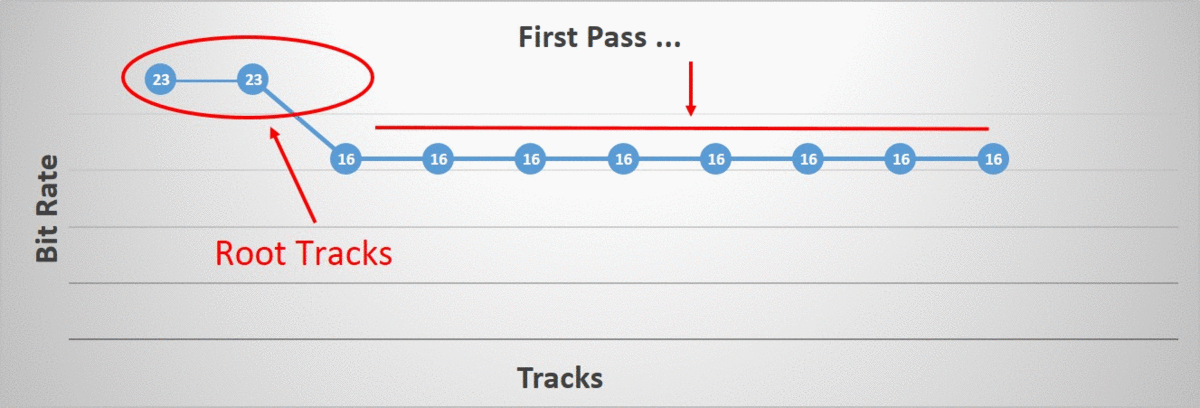
First Phase
The first phase will lower the bit rate of every track in lock step as much as possible until we cannot do so without exceeding our error threshold. This allows us to quickly trim the search space by finding the best bit rate globally for a given block. However, there is one exception, during the duration of the first phase, the root tracks remain locked to the highest bit rate and thus the highest accuracy. This is done because some clips, such as a world space cinematic, have an unusually high accuracy requirement on the root tracks and if we process them as we do the others, they will negatively bias the rest of the tracks.
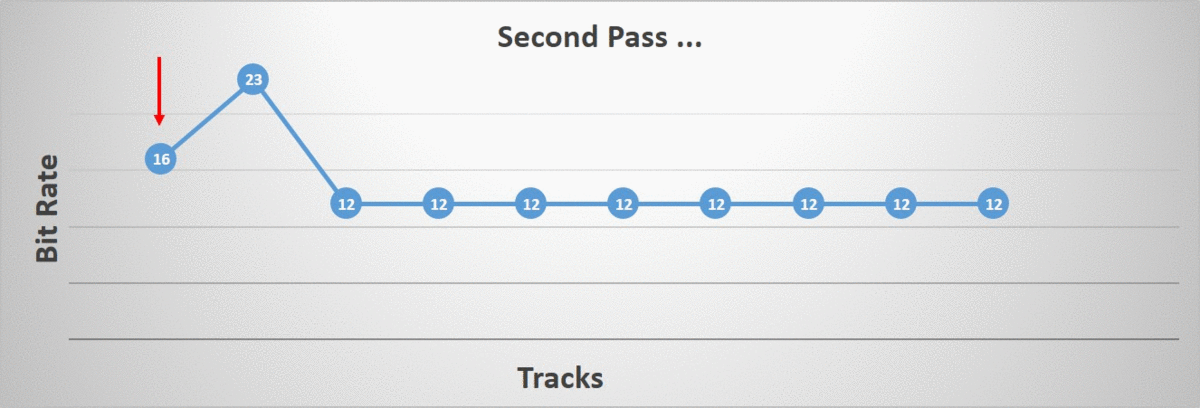
Second Phase
The second phase iterates over all of our tracks and aims to individually lower their bit rate as much as possible up until we reach our error threshold. The algorithm terminates once all tracks have been processed.
The order in which the tracks are processed matters. I tried two different orderings: starting at the root bone and going down the hierarchy towards the children and the opposite ordering, starting at the leaf bones and going back up towards the root. As it turns out, the distribution of which bit rate was selected by our algorithm changed quite a bit. Note that in the image, the right-most bit rates are very uncommon but they do happen (they are too rare to show up).
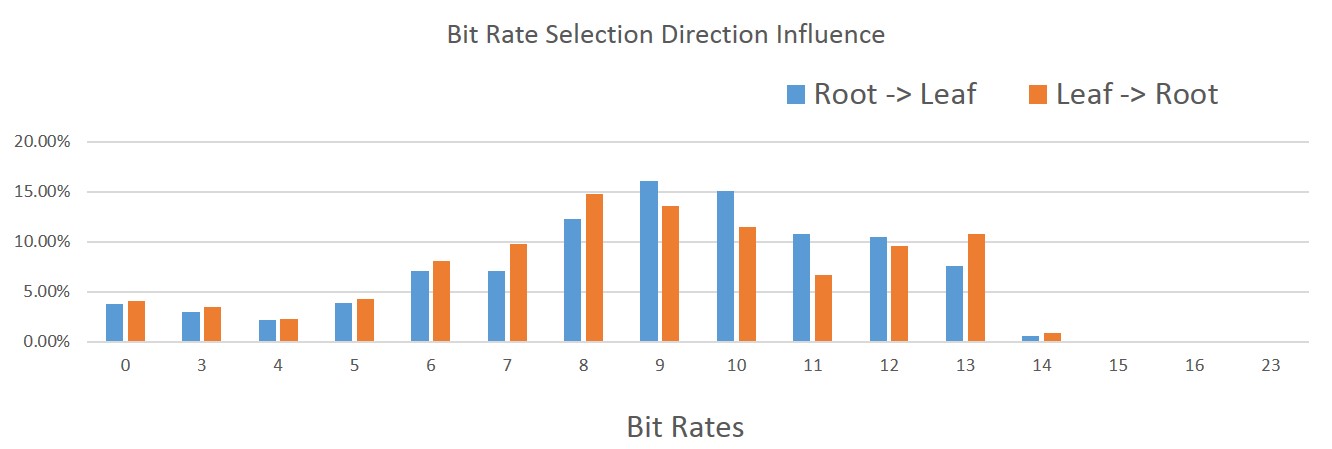
Starting at the leaf bones, a higher incidence of lower bit rates were selected. This intuitively makes sense since we have more children than we have parents in our hierarchy. On the other hand, we also have a higher incidence of higher bit rates. Again this makes sense since by lowering the children first, we force the parents to retain more bits in order to preserve the accuracy.
Overall, in the data that I had on hand, starting at the leaf bones and going towards the root resulted in a memory footprint that was roughly 2% smaller without impacting the compression time, accuracy, and our decompression time.
The compression speed remains acceptable and it can easily be optimized by evaluating all blocks to compress in parallel.
On the decompression side, everything we do is very simple and fast. Since our data is uniform, all of our data is linearly contiguous in memory and a full key frame typically fits within a handful of cache lines (2-5). This is extremely dense and contributes to our very fast decompression. Sadly due to our variable bit rates, we can easily end up performing unaligned reads but their performance remains entirely acceptable on x64 and even with SSE. In fact, with minimal work, everything can be done in SSE and we could even use the streaming read (non-temporal read) intrinsics if we wanted to.
Up next: Sub-sampling
Back to table of contents
08 Mar 2017
In early 2016 I had the opportunity to write a novel animation compression algorithm for Eidos Montreal as part of the game engine previously used by Rise of the Tomb Raider (2015). Later in February 2017, I had the pleasure to present it at the Game Developers Conference (GDC).
The slides for the presentation can be found here and a blog post detailing the technique can be found here.
Back to table of contents
30 Jan 2017

Unity 5 is a very popular video game engine on mobile devices and other platforms. Being a state of the art game engine, it supports everything you might need when it comes to character animation including compression.
The relevant FBX Importer and Animation Clip documentation is very sparse. It’s worth mentioning that Unity 5 is a closed source software and as such, there is some amount of uncertainty and speculation. However, I was able to get in touch with an old colleague working at Unity to clarify what happens under the hood.
Before we dig into what each compression setting does we must first briefly cover the data representations that Unity 5 uses internally.
Track Data Encoding
The engine uses one of three encodings to represent an animation track regardless of the track data type (quaternion, vector, float, etc.):
Rotation tracks are always encoded as four curves to represent a full quaternion (one curve per component). An obvious win here could be to instead encode rotations as quaternion logarithms or by dropping the quaternion W component or the largest component. This would of course immediately reduce the memory footprint for rotation tracks by 25% at the expense of a few instructions to reconstruct the original quaternion.
Legacy Curve
Legacy curves are a strange beast. The source data is sampled uniformly at a fixed interval such as 30 FPS and is kept unsorted in full precision. Using discreet samples during decompression a Hermite curve is constructed on the fly and interpolated. It is unclear to me how this format emerged but it has since been superseded by the other two and it is not frequently used.
It must have been quite slow to decompress and should probably be avoided.
Streaming Curve
Streaming curves are proper curves that use Hermite coefficients. A track is split into intervals and each interval is encoded as a distinct spline. This allows discontinuities between intervals. For example, a camera cut or teleporting the root in a cinematic. Each interval has a small header of 8 bytes and each control point is stored in full floating point precision plus an index. This is likely overkill. Full floating point precision is typically far too much for encoding rotations and using simple quantization to store them on 16 bits per component or less could provide significant memory savings.
The resulting control points are sorted by time followed by track to render them as cache as efficient as possible which is a very good thing. At decompression, a cursor or cache is used to avoid repeatedly searching for our control points when playback is continuous and predictable. For these two reasons streaming curves are very fast to decompress in the average use case.
Dense Curve
What Unity 5 calls a dense curve I would call a raw format. The original source data is sampled at a fixed interval such as 30 FPS and nothing more is done to it as far as I am aware. The data is sorted to make it cache efficient by time and track. No linear key reduction is performed or attempted. The sampled values are not quantized and are simply stored with full precision.
Dense curves will typically have a smaller memory footprint than streaming curves only for very short tracks or for tracks where the data is very noisy such as a motion capture. For this reason, they are unlikely to be used in practice.
Overall their implementation is simple but perhaps a bit naive. Using simple quantization would give significant memory gains here without degrading decompression performance and might even speed it up! On the upside decompression speed is very likely to be faster than with streaming curves.
Compression Settings
At the time of writing, Unity 5 supports three compression settings:
No Compression
The most detailed quote from the documentation about what this setting does is:
Disables animation compression. This means that Unity doesn’t reduce keyframe count on import, which leads to the highest precision animations, but slower performance and bigger file and runtime memory size. It is generally not advisable to use this option - if you need higher precision animation, you should enable keyframe reduction and lower allowed Animation Compression Error values instead.
From what I could gather the originally imported clip is sampled uniformly (e.g. 30 FPS) and each track is converted into a streaming curve. This ensures everything remains smooth and accurate but the overhead can be very significant since all samples are retained. To make things worse nothing is done for constant tracks with this setting.
Keyframe Reduction
The most detailed quote from the documentation is:
Removes redundant keyframes.
When this setting is used constant tracks will be collapsed to a single value and redundant control points in animated tracks which will be removed within the specified error threshold. This setting uses streaming curves to represent track data.
Only three thresholds are exposed for this compression setting. One for each track type: rotation, translation, and scale. This is very likely to lead to the problems discussed in my post on measuring accuracy. And indeed, a quick search yields this gem. Even though it dates from Unity 3(2010), I doubt the animation compression has changed much. Unfortunately, the problems it raises are both very telling and common with local space error metric functions. Here are some relevant excerpts:
Now, you may be asking yourself, why would this guy turn off the key reducer in the first place? The answer is simple. The key reducer sucks. Here’s why.
Every animation I have completed for this project uses planted keys to anchor the feet (and sometimes hands) to the floor. This allows me to grab any part of the body and animate it, knowing that the feet will not move. When I export the FBX, the keys stay intact. I can bring the animation back into Max or into Maya using the keyframe reducer for either software, and the feet remain anchored. When I bring the same FBX into Unity the feet slide around. Often quite noticably. The only way to stop the feet from sliding is to turn off the key reducer.
This is a very common problem with local space error functions. Tweaking them is hard! The end result is that very often a weaker compression or no compression at all is used when issues are found on a clip by clip basis. I have seen this exact behavior from animators working on Unreal 3 back in the day and very recently in a proprietary AAA game engine. Even though from the user’s perspective the issue is the animation compression algorithm, in reality, the issue is almost entirely due to the error function.
What I would really like to see is some options within Unity’s animation importer. A couple ideas:
1) Max’s FBX keyframe reduction has several precision threshold settings that dictate how accurate the keyframe reduction should be. In Unity, it’s all or nothing. I would love the ability to adjust the threshold in which a keyframe gets added. I could turn up the sensitivity on some animations to reduce sliding and possibly turn it down on areas that need fewer keys than are given by the current value.
2) I’m not sure if this is possible, but it would be great to set keyframe reductions on some bones and not others. That way I can keep the arm chain in the proper location without having to bloat the keyframes of every bone in the whole skeleton.
Exposing a single error threshold per track type is very common and provides a source of frustration for animators. They often know which bones need higher accuracy but are unable to properly tweak per bone thresholds. Sadly, when this feature is present the settings often end up being copy & pasted with overly conservative values which yield a higher than needed memory footprint. Nobody has time to tweak a large number of thresholds repeatedly.
Unity 3 actually corrects the problem by giving us direct control over the keyframe reduction vs allowable error. If you find your animation is sliding to much, dial down the Position Error and/or Rotation Error settings in the animation import settings.
Unfortunately, I didn’t find any satisfying setup :/
I got some characters that move super fast in their anim, and I need the player to see the move correctly for gameplay / balance reasons.
So it can works for some anims, but not for others (making them feel like they are teleporting).
And under a certain reduction threshold, the memory size benefit is too small to resolve loading times problem :/
In fact, the only reduction setting I found that didn’t caused teleportations was :
Position : 0.1
Rotation : 0.1
Scale : 0 (as there is never any animated scale)
But this is still causing huge file sizes :(
A single error threshold per track type also means that the error threshold has to be as low as your most sensitive bone requires. This will, in turn, retain higher accuracy that might otherwise be needed yielding again a higher memory footprint that is often unacceptable.
Optimal
The most detailed quote from the documentation is:
Let unity decide how to compress. Either by keyframe reduction or by using dense format. Unity will pick the most optimal of the two.
This is very vague and judging from the results of a quick search, a lot of people are curious.
Thankfully, I was able to get some answers!
If a track is very short or very noisy (which could happen with motion capture clips or baked simulations), the key reduction algorithm might not give appreciable gains and it is possible that a dense curve might end up having a smaller memory footprint than a streaming curve. When this happens for a particular track it will use the curve with the smallest memory footprint. As such, within a single clip, we can have a mix of dense and streaming curves.
Conclusion
The Unity 5 documentation is sparse and at times unclear. It leads to rampant speculation as to what might be going on under the hood and a lot of confusing results.
Its error function is poor, exposing a single value per track type. This leads to classic issues such as turning compression off to retain accuracy and using an overly conservative threshold to retain accuracy at the expense of the memory footprint. It perpetuates the stigma that animation compression can be painful to work with and can easily butcher an animator’s work without manual tweaking. Fixing the error function could be a reasonably simple task.
The optimal compression setting seems to be a very reasonable default value but it is not clear why the other two are exposed at all. Users are very likely to use one of the other settings instead of tweaking the error function thresholds which is probably a bad idea.
All curve types encode the data in full precision with 32-bit floating point numbers. This is likely overkill in a very large number of scenarios and implementing some form of simple quantization could provide huge memory gains with little work and little effort. Due to the reduced memory footprint, decompression timings might even improve.
Furthermore, rotation tracks could be encoded in a better format than a full quaternion further reducing the memory footprint for minimal work.
From what I could find nobody seemed to complain about animation decompression performance at runtime. This is mostly likely a direct result of the cache friendly data format and the usage of a cursor for streaming curves.
Up next: GDC 2017 Presentation
Back to table of contents
11 Jan 2017

Unreal 4 offers a wide range of documented character animation compression settings.
It offers the following compression algorithms:
Note: The following review was done with Unreal 4.15
Least Destructive
Reverts any animation compression, restoring the animation to the raw data.
This setting ensures we use raw data. It sets all tracks to use no compression which means they will have full floating point precision where None is used for translation and Float 96 for rotation, explained below. Interestingly it does not appear to revert the scale to a sensible default raw compression setting which is likely a bug.
Remove Every Second Key
Keyframe reduction algorithm that simply removes every second key.
This setting does exactly what it claims; it removes every other key. It is a variation of sub-sampling. Each remaining key is further bitwise compressed.
Note that this compression setting also removes the trivial keys.
Remove Trivial Keys
Removes trivial frames of tracks when position or orientation is constant over the entire animation from the raw animation data.
This takes advantage of the fact that very often tracks are constant and when it happens a single key is kept and the rest is discarded.
Bitwise Compress Only
Bitwise animation compression only; performs no key reduction.
This compression setting aims to retain every single key and encodes them with various variations. It is a custom flavor of simple quantization and will use the same format for every track in the clip. You can select one format per track type: rotation, translation, and scale.
These are the possible formats:
- None: Full precision.
- Float 96: Full precision is used for translation and scale. For rotations, a quaternion component is dropped and the rest are stored with full precision.
- Fixed 48: For rotations, a quaternion component is dropped and the rest is stored on 16 bits per component.
- Interval Fixed 32: Stores the value on 11-11-10 bits per component with range reduction. For rotations, a quaternion component is dropped.
- Fixed 32: For rotations, a quaternion component is dropped and the rest is stored on 11-11-10 bits per component.
- Float 32: This appears to be a semi-deprecated format where a quaternion component is dropped and the rest is encoded onto a custom float format with 6 or 7 bits for the mantissa and 3 bits for the exponent.
- Identity: The identity quaternion is always returned for the rotation track.
Only three formats are supported for translation and scale: None, Interval Fixed 32, and Float 96. All formats are supported for rotations.
If a track has a single key it is always stored with full precision.
When a component is dropped from a rotation quaternion, W is always selected. This is safe and simple since it can be reconstructed with a square root as long as our quaternion is normalized. The sign is forced to be positive during compression by negating the quaternion if W was originally negative. A quaternion and its negated opposite represent the same rotation on the hypersphere.
Sadly, the selection of which format to use is done manually and no heuristic is used to perform some automatic selection with this setting.
Note that this compression setting also removes the trivial keys.
Remove Linear Keys
Keyframe reduction algorithm that simply removes keys which are linear interpolations of surrounding keys.
This is a classic variation on linear key reduction with a few interesting twists.
They use a local space error metric coupled with a partial virtual vertex error metric. The local space metric is used classically to reject key removal beyond some error threshold. On the other hand, they check the impacted end effector (e.g. leaf) bones that are children of a given track. To do so a virtual vertex is used but no attempt is made to ensure it isn’t co-linear with the rotation axis. Bones in between the two bones (the one being modified and the leaf) are not checked at all and should they end up with unacceptable error, it will be invisible and not accounted for by the metric.
There is also a bias applied on tracks to attempt to remove similar keys on children and their parent bone tracks. I’m not entirely certain why they would opt to do this but I doubt it can harm the results.
On the decompression side no cursor or acceleration structure is used; meaning that each time we sample the clip we will need to search for which keys to interpolate between and we do so per track.
Note that this compression setting also removes the trivial keys.
Compress each track independently
Keyframe reduction algorithm that removes keys which are linear interpolations of surrounding keys, as well as choosing the best bitwise compression for each track independently.
This compression setting combines the linear key reduction algorithm along with the simple quantization bitwise compression algorithm.
It uses various custom error metrics which appear local in nature with some adaptive bias. Each encoding format will be tested for each track and the best result will be used based on the desired error threshold.
Automatic
Animation compression algorithm that is just a shell for trying the range of other compression schemes and picking the smallest result within a configurable error threshold.
A large mix of the previously mentioned algorithms are tested internally. In particular, various mixes of sub-sampling are tested along with linear key reduction and simple quantization. The best result is selected given a specific error threshold. This is likely to be somewhat slow due to the large number of variations tested (35 at the time of writing!).
Conclusion
In memory, every compression setting has a layout that is naive with the data sorted by tracks followed by keys. This means that during decompression each track will incur a cache miss to read the compressed value.
Performance wise, decompression times are likely to be high in Unreal 4 in large part due to the memory layout not being cache friendly and the lack of an acceleration structure such as a cursor when linear key reduction is used; and it is likely used often with the Automatic setting. This is an obvious area where it could improve.
Memory wise, the linear key reduction algorithm should be fairly conservative but it could be minimally improved by ditching the local space error metric. Coupled with the bitwise compression it should yield a reasonable memory footprint; although it could be further improved by using more advanced quantization techniques.
Up next: Unity 5
Back to table of contents
23 Dec 2016
In order to keep the material concrete, we will take a deeper look at some popular video game engines. We will highlight the techniques that they use for character animation compression and where they shine or come short.
Up next: Unreal 4
Back to table of contents