23 Jan 2022
A little over three years ago, I wrote about storing animation clips relative to the bind pose in order to improve the compression ratio. In a gist, this stores each clip as an additive onto the base bind pose.
This does two things for us:
- It reduces the range of each sub-track (rotation, translation, scale) which allows more accuracy to be retained (e.g. instead of having the pelvis bone animating at 60cm above the root on the ground, it will animate around 0cm relative to the bind position 60cm above said ground).
- It increases the likelihood that sub-tracks will become equal to their identity value as very often joints are not animated and will be equal to their bind pose value. This allows us to remove their values entirely from the compressed byte stream since we only need a bit set to reconstruct them: whether the value is equal to the identity or not.
It is very common for sub-tracks to not be animated and to retain the bind pose value, especially for translations. For example, upper body animations might have all of the lower body be identical to the bind pose. Facial animations might have the rest of the body equal to it. For that reason, at the time, I reported memory savings of up to 8% with that method.
The main drawback of the technique is that in order to reconstruct the clip, we have to apply the output pose onto the bind pose much like we would with an additive clip. This means performing an expensive transform multiplication. With a QVV (quat-vec3-vec3) format, this means performing three quaternion multiplications which isn’t cheap.
However, there is an alternate way to leverage the bind pose to achieve similar memory savings without the expensive overhead: stripping it entirely.
How it works
The Animation Compression Library now allows you to specify per joint what its default value should be. Default values are not stored within the compressed clip and instead rely on a simple bit set.
If a sub-track is not animated, it has a constant value across all its samples. If that constant value is equal to the default value specified, then ACL simply strips it. Later, during decompression, if a sub-track has a default value, we simply write it into the output pose.
ACL is very flexible here and it allows you to specify either a constant value for every default sub-track (e.g. the identity) or you can use a unique value per sub-track (e.g. the bind pose). This way, the full output pose can be safely reconstructed. As a bonus, it also allows default sub-tracks to be skipped entirely. This is very handy when you pre-fill the output pose buffer with the bind pose before decompressing a clip. This can be achieved efficiently with memcpy (or similar) and during decompression default sub-tracks will be skipped, leaving the value untouched in the output pose.
By removing the bind pose, we achieve a very similar result as we would storing the clip as an additive on top of it. We can leverage the fact that many sub-tracks are not animated and are equal to their bind pose value. However, we do not reduce the range of motion.
Crucially, reconstructing the original pose is now much cheaper as it does not involve any expensive arithmetic and the bind pose will often be warm in the CPU cache as multiple clips will use it and it might be used for other things as part of the animation update/evaluation.
Side note: Reducing the range of motion can be partially achieved for translation and scale by simply removing the bind pose value with component wise subtraction. This allows us to reconstruct the original value by adding the bind pose values which is very cheap.
Results
Now that ACL supports this, I measured bind pose stripping against two data sets:
I measured the final compressed size before and after as well as the 99th percentile error (99% of joint samples have an error below this value):
| CMU |
Before |
After |
| Compressed size |
75.55 MB |
75.50 MB |
| Track error 99th percentile |
0.0088 cm |
0.0088 cm |
For CMU, the small gain is expected due to the nature of motion capture data and bind pose stripping performs about as well as storing clips relative to it. Motion capture is often noisy and sub-tracks are unlikely to be constant, let alone equal to the bind pose.
| Paragon |
Before |
After |
| Compressed size |
224.30 MB |
220.85 MB |
| Track error 99th percentile |
0.0095 cm |
0.0090 cm |
However, for Paragon, the results are 1.54% smaller. It turns out that quite a few clips are adversely impacted by bind pose stripping. They can end up with a size far higher which I found surprising.
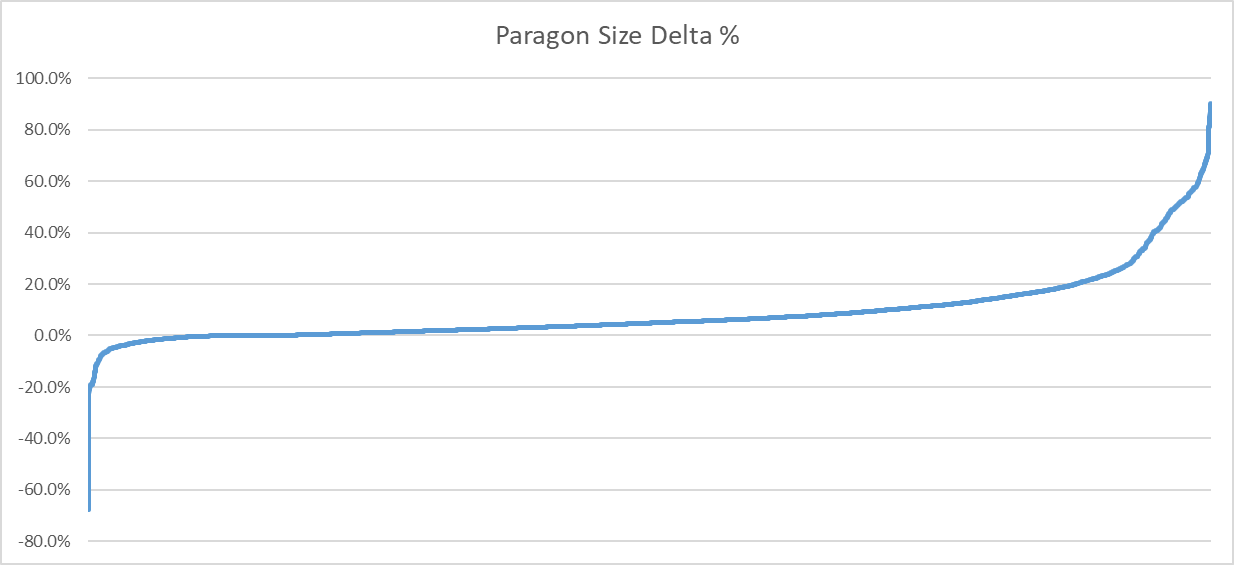
In the above image, I plotted the size delta as a percentage. Positive values denote a reduction in size.
As we can see, for the vast majority of clips, we observe a reduction in size: 5697 (87% of) clips ended up smaller. Over 1889 (29% of) clips saw a reduction of 10% or more. The median represents 4.8% in savings. Not bad!
Sadly, 59 (1% of) clips saw an increase in size of 10% or more with the largest increase at 67.7%.
Looking at some of the clips that perform terribly helped shed some light as to what is going on. Clips that have long bone chains of default sub-track values equal to their bind pose can end up with very high error. To compensate ACL retains more bits to preserve quality. This is caused by two things.
First, we use an error threshold to detect when a sub-track is equal to its default value or not. Even though the error threshold is very conservative, a very small amount of error is introduced and it can compound in long bone chains.
Second, when we measure the compression error, we do so by using the original raw clip. Because the bind pose values we strip rely on the error threshold mentioned above, the optimization algorithm can end up trying to reach a pose that is can never reach. For example, if a joint is stripped by being equal to the bind pose and doing so introduces an error of 1cm on some distant child, even if every joint in between remains with full raw precision values, the error will remain.
Side note, constant sub-tracks use the same error threshold to detect if they are animated or not which can lead to the same issues happening.
This is not easily remedied without some form of error compensation which ACL does not currently support. However, I’m hoping to integrate a partial solution in the coming months. Stay tuned!
Side note, we could pre-process the raw data to ensure that constant and default sub-tracks are clean with every sample perfectly repeating. This would ensure that the error metric does not need to compensate. However, ACL does not own the raw data and as such it cannot do such transformations safely. A future release might expose such functions to clean up the raw data prior to compression.
Conclusion
For the time being I recommend that if you use this new feature, you should also try not stripping the bind pose and pick the best of the two results (for most clips, ACL compresses very fast). The develop branch of the Unreal Engine 4 ACL plugin now supports this experimental feature and testing both codec variations can easily be achieved there (and in parallel too).
Anedoctally, a few people have reached out to me about leveraging this feature and they reported memory savings in the 3-5% range. YMMV.
While the memory savings of this technique aren’t as impressive as storing clips as additives of the bind pose, their dramatically lower decompression cost makes it a very attractive optimization.
Back to table of contents
04 May 2021
After 18 months of work, the Animation Compression Library has finally reached v2.0 along with an updated v2.0 Unreal Engine 4 plugin.
Notable changes in this release include:
Overall, this release is cleaner, leaner, and much faster.
Decompression is now 1.4x (PC) to 1.8x (Mobile) faster than ACL 1.3 which is no small feat! I’ll be writing a blog post in the next few months with the juicy details. To make this possible, the memory footprint may increase slightly (mostly header related changes, a few bytes here and there, and alignment padding) but many datasets showed no increase at all. Quality remains unchanged.
What’s next
I’ve already started fleshing out the task list for the next minor release here. This release will bring about more memory footprint improvements.
If you use ACL and would like to help prioritize the work I do, feel free to reach out and provide feedback or requests!
ACL 2.0 turned out to be a massive undertaking and it took countless hours, late nights, and weekends to make it happen (over 1700 commits since the project began 4 years ago). As such, I’ll pause development for a month or two (or three) while I focus on writing a few blog posts I’ve been meaning to get to and take a much needed break. However, I’ll continue to make patch releases during this time if anything important pops up.
Special thanks to NCSOFT for sponsoring many of the improvements that came with this major release!
17 Jan 2021
For a few years now, I’ve had ideas on how to leverage streaming to further improve compression with the Animation Compression Library. Thanks to the support of NCSOFT, I’ve been able to try them out and integrate progressive quality streaming for the upcoming 2.0 release next month.
Progressive quality streaming is perfectly suited for modern games on high end consoles all the way down to mobile devices and web browsers. Its unique approach will empower animators to better control animation quality and when to pay the price for it.
Space is precious
For many mobile and web games out there, the size of animation data remains an ever present issue. All of this data needs to be downloaded on disk and later loaded into memory. This takes time and resources that devices do not always have in large supply. Moreover, on a small screen, the animation quality doesn’t matter as much as compression artifacts are often much less visible than on a large 4K monitor. Although it might seem like an ancient problem older consoles and early mobile phones had to worry about, many modern games still contend with it today.
A popular technique to deal with this is to use sub-sampling: take the key frames of an input animation clip and re-sample it with fewer key frames (e.g. going from 30 FPS to 24 FPS). Unreal Engine 4 implements a special case of this called frame stripping: every other key frame is removed.
By their nature, these techniques are indiscriminate and destructive: the data is permanently removed and cannot be recovered. Furthermore, if a specific key frame is of particular importance (e.g. highest point of a jump animation), it could end up being removed leading to undesirable artifacts. Despite these drawbacks, they remain very popular.
In practice, some data within each animation cannot be removed (metadata, etc) and as I have documented in a previous blog post, the animated portion of the data isn’t always dominant. For that reason, frame stripping often yields a memory reduction around 30-40% despite the fact that we remove every other key frame.
Bandwidth is limited
Animation data also competes with every other asset for space and bandwidth. Even with modern SSDs, loading and copying hundreds of megabytes of data still takes time. Modern games now have hundreds of megabytes of high quality textures to load as well as dense geometry meshes. These often have solutions to alleviate their cost both at runtime and at load time in the form of Levels of Details (e.g. mip maps). However, animation data does not have an equivalent to deal with this problem because animations are closer in spirit to audio assets: most of them are either very short (a 2 second long jump and its 200 millisecond sound effect) or very long (a cinematic and its background music).
Most assets that leverage streaming end up doing so in one of two ways: on demand (e.g. texture/mip map streaming) or ahead of time (e.g. video/audio streaming). Sadly, neither solution is popular with animation data.
When a level starts, it generally has to wait for all animation data to be loaded. Stalling and waiting for IO to complete during gameplay would be unacceptable and similarly playing a generic T-stance would quickly become an obvious eye sore. By their nature, gameplay animations can start and end at any moment based on player input or world events. Equally worse, gameplay animations are often very short and we wouldn’t have enough time to stream them in part (or whole) before the information is needed.
On the other hand, long cinematic sequences that contain lots of data that play linearly and predictably can benefit from streaming. This is often straightforward to implement as the whole animation clip can be split into smaller segments each compressed and loaded independently. In practice, cinematics are often loaded on demand through higher level management constructs and as such progressive streaming is not very common (UE4 does support it but to my knowledge it is not currently documented).
The gist
Here are the constraints we work with and our wish list:
- Animations can play at any time and must retain some quality for their full duration
- Not all key frames are equally important, some must always be present while others can be discarded or loaded later
- Most animations are short
- Large contiguous reads from disk are better than many small random reads
- Decompression must remain as fast as possible
Enter progressive quality streaming
Because most animations are short, it makes sense to attempt to load their data in bulk. As such, ACL now supports aggregating multiple animation clips into a single database. Important key frames and other metadata required to decompress will remain in the animation clip and optionally at runtime, the database can be provided to feed it the remaining data.
This leads us to the next question: how do we partition our data? How do we determine what remains in the animation clip and what can be streamed later? Crucially, how do we make sure that decompression remains fast now that our data can live in multiple locations?
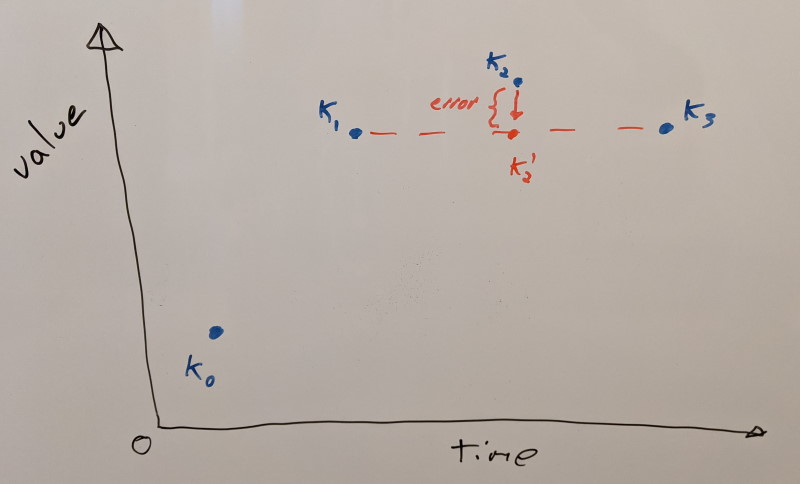
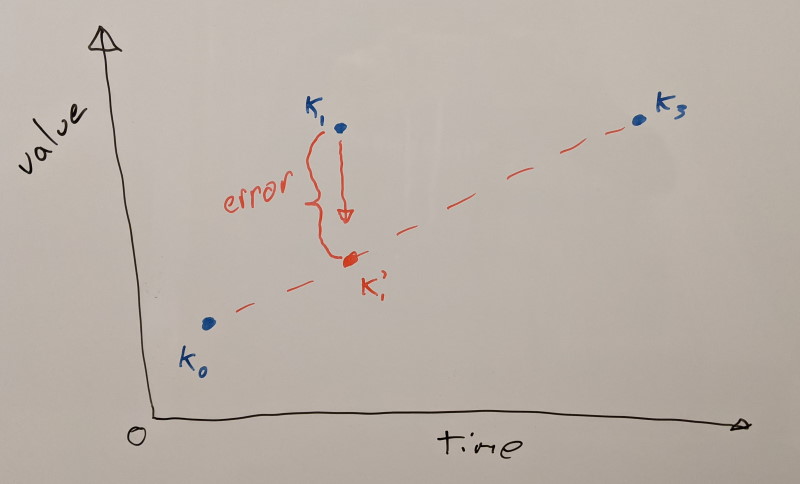
To solve this second part of the problem, during compression ACL will tag each whole key frame with how much error removing it contributes. We use this information to construct a variant of linear key reduction where only whole key frames are removed. However, in our case, they will simply be moved to the database instead of being lost forever. This allows us to quickly find the data we need when we sample our animation clip with a single search for which key frames we need. This helps keep the cost constant regardless of how many key frames or joints an animation clip has. By further limiting the number of key frames in a segment to a maximum of 32, finding the data we need boils down to a few bit scanning operations efficiently implemented in hardware.
The algorithm is straightforward. We first assume that every key frame is retained. We’ll pick the first that is movable (e.g. not first/last in a segment) and measure the resulting error when we remove it (both on itself and on its neighbors that might have already been removed). Any missing key frames are reconstructed using linear interpolation from their neighbors. To measure the error, we use the same error metric used to optimize the variable bit rates. We record how much error is contributed and we add back the key frame. We’ll iterate over every key frame doing so. Once we have the contributing error of every key frame, we’ll pick the lowest error and remove that key frame permanently. We’ll then repeat the whole process with the remaining key frames. Each step will remove the key frame that contributes the least error until they are all removed. This yields us a sorted list of how important they are. While not perfect and exhaustive, this gives us a pretty good approximation. This error contribution is then stored as extra metadata within the animation clip. This metadata is only required to build the database and it is stripped when we do so.
Now that we know which key frames are important and which aren’t, we’ll iterate over every animation clip and move the least important key frames out into the database first. Our most important key frames will remain within each animation clip to be able to retain some quality if we need to play back either with no database or with partial database data. How much data each tier will contain is user controlled and optionally the lowest tier can be stripped.
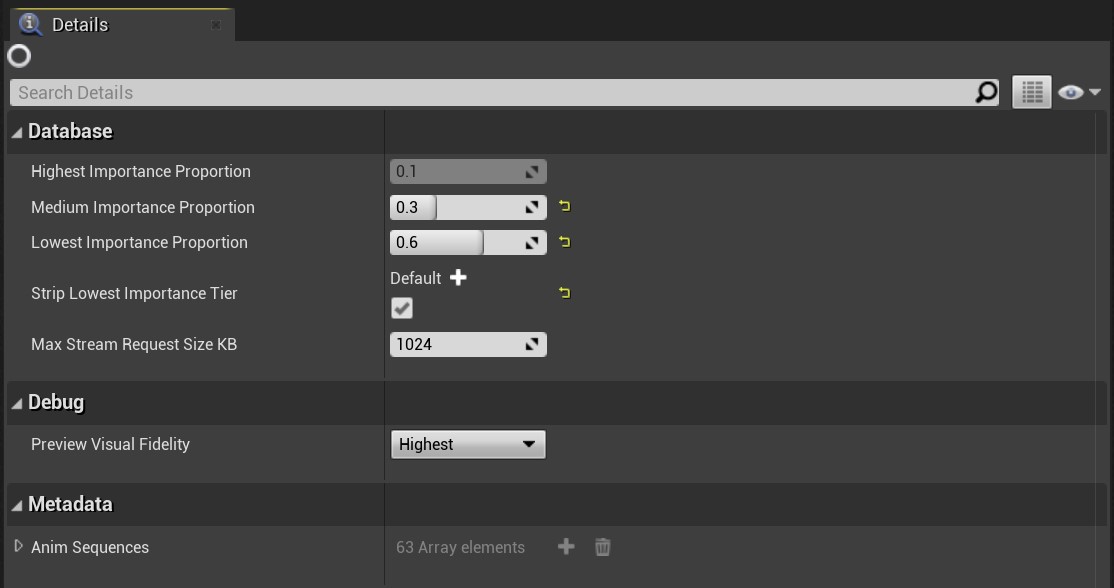
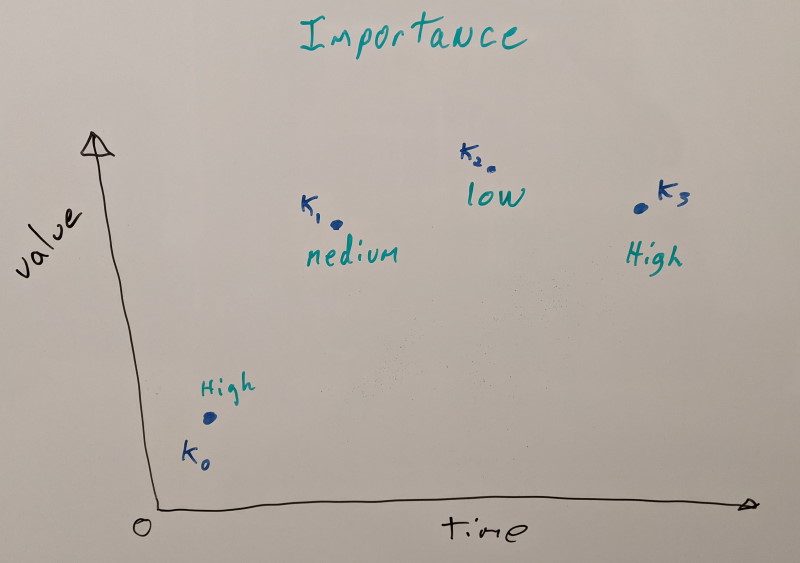
We consider three quality tiers for now:
- High importance key frames will remain in the animation clips as they are not optional
- Medium and low importance key frames are moved to the database each in its separate tier which can be streamed independently
Since we know every clip that is part of the database, we can find the globally optimal distribution. As such, if we wish to move the least important 50% percent, we will remove as much data as frame stripping but now the operation is far less destructive. Some clips will contribute more key frames than others to reach the same memory footprint. This is frame stripping on steroids!
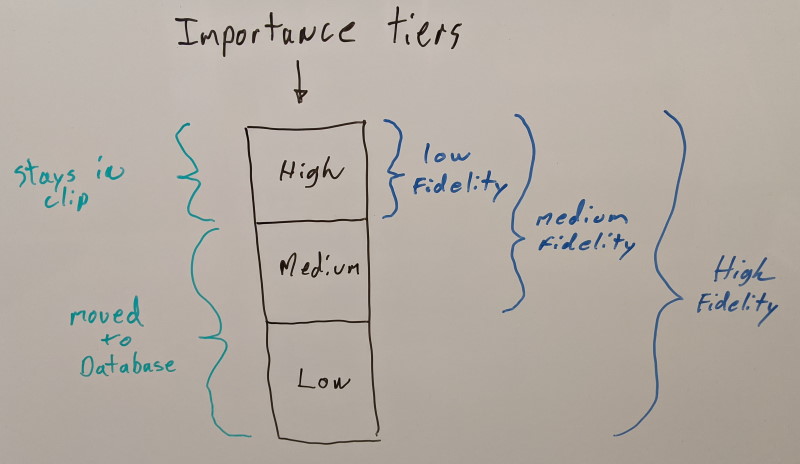
This partitioning allows us to represent three visual fidelity levels:
- Highest visual fidelity requires all three importance quality tiers to be loaded
- Medium visual fidelity requires only the high and medium importance tiers to be loaded
- Lowest visual fidelity requires only the high importance tier to be loaded (the clip itself)
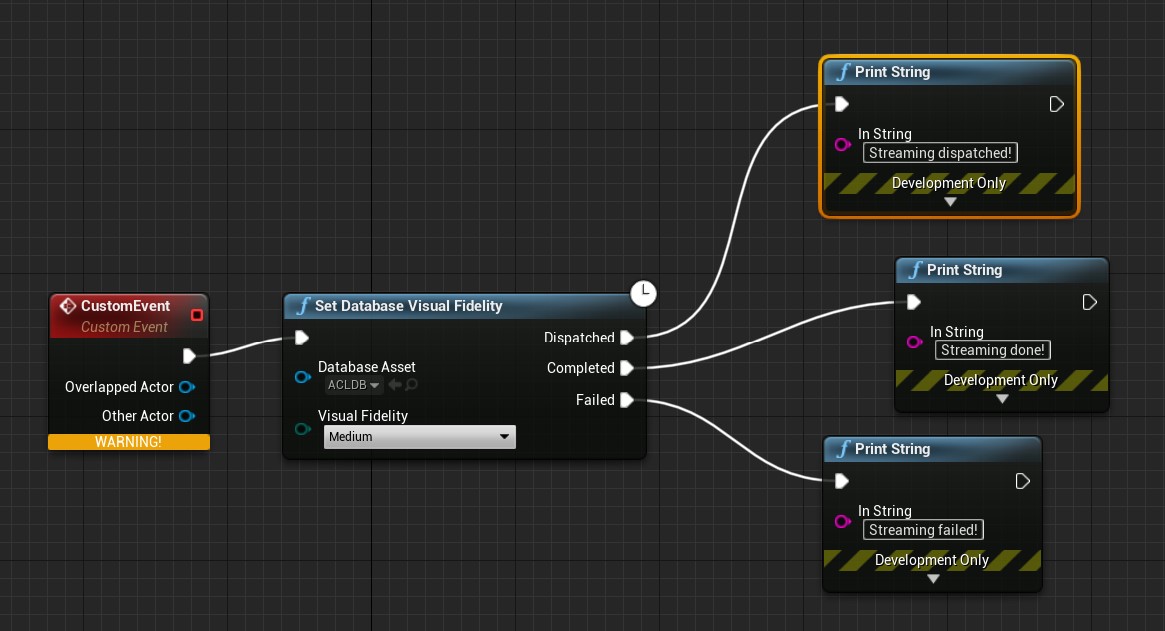
Under the hood, ACL allows you to stream both tiers independently and in any order you wish. For simplicity, the UE4 plugin exposes the desired visual fidelity level and the streaming request size granularity while abstracting what needs to stream in or out. This allows the game to allocate memory on demand when data is streamed in while also allowing the game to unload tiers that are no longer needed. In a pinch, the entire database can be unloaded or destroyed and animations can continue to play at the lowest visual fidelity level.
Unprecedented control
What this means is that you can now group animations into as many databases as makes sense for your game. Some animations always need the highest fidelity and shouldn’t belong to any database (e.g. main character locomotion) while general gameplay animations and exotic animations (e.g. emotes) can be split into separate databases for ultimate control. You can now decide at a high level how much data to stream later and when to stream it. Crucially, this means that you can decide ahead of time if a quality tier isn’t required and strip it entirely from disk or you can make that decision at runtime based on the device the game runs on.
You can make a single package for your mobile game that can run with reduced quality on lower end devices while retaining full quality for higher end ones.
Your multiplayer game can stream in the hundreds of emotes by grouping them by popularity lazily in the background.
via GIPHY
Room to grow
Because the feature is new, I had to make a few executive decisions to keep the scope down while leaving room for future changes. Here are a few points that could be improved on over time.
I had to settle on three quality tiers both for simplicity and performance. Making the number arbitrary complicates authoring while at the same time might degrade decompression performance (which now only adds 100-150 instructions and 2 cache misses compared to the normal path without a database lookup). That being said, if a good case can be made, that number could be increased to five without too much work or overhead.
Evaluating how much error each key frame contributes works fine but it ends up treating every joint equally. In practice, some joints contribute more while others contribute less. Facial and finger joints are often far less important. Joints that move fast are also less important as any error will be less visible to the naked eye (see Velocity-based compression of 3D rotation, translation, and scale animations by David Goodhue about using velocity to compress animations). Instead of selecting the contributing error solely based on one axis (which key frame), we could split into a second axis: how important joints are. This would allow us to retain more quality for a given quality tier while reaching the same memory footprint. The downside though is that this will increase slightly the decompression cost as we’ll now need to search for four key frames to interpolate (we’ll need two for high and two for low importance joints). Adding more partitioning axes increases that cost linearly.
Any key frame can currently be moved to the database with two exceptions: each internal segment retains its first and last key frame. If the settings are aggressive enough, everything else can be moved out into the database. In practice, this is achieved by simply pinning their contributing error to infinity which prevents them from being moved. This same trick could be used to prevent specific key frames from being moved if an animator wished to author that information and feed it to ACL.
In order to avoid small reads from disk, data is split into chunks of 1 MB. At runtime, we specify how many chunks to stream at a time. This means that each chunk contains multiple animation clips. No metadata is currently kept for this mapping and as a result it is not currently possible to stream in specific animation clips as it would somewhat defeat the bulk streaming nature of the work. Should this be needed, we can introduce metadata to stream in individual chunks but I hope that it won’t be necessary. In practice, you can split your animations into as many databases as you need: one per character, per character type, per gameplay mode, etc. Managing streaming in bulk ensures a more optimal usage of resources while at the same time lowering the complexity of what to stream and when.
Coming soon
All of this work has now landed into the main development branches for ACL and its UE4 plugin. You can try it out now if you wish but if not, the next major release scheduled for late February 2021 will include this and many more improvements. Stay tuned!
Animation Compression Table of Contents
27 Dec 2020
This weekend, I noticed that AMD Ryzen Master (a great tool to control your CPU when profiling code performance) and VirtualBox both stopped working for me under Windows 10. I wasn’t too sure how it happened and I spent a good deal of time chasing what went wrong so I am documenting my process and result here in hope that it might help others as well.
Why aren’t they working?
Over the last few years, Windows has been roling out a hypervisor of its own: Hyper-V. This allows you to run virtual machines (without VMWare, VirtualBox, or some other similar program). It also allows isolation of various security components, further improving kernel safety. When the hypervisor is used, Windows runs inside it, much like a guest OS runs inside a host OS in a virtual machine setup. This is the root cause of my woes.
AMD Ryzen Master complains (see also this) that Virtualization Based Security (VPS) is enabled. From my understanding, what this means is that running this program within a virtual machine isn’t supported or recommended. Some hacks are floating around to patch the executable to allow the check to be skipped and it does appear to work (although I haven’t tested it myself). Attempting to disable VPS lead me to pain and misery and in the end nothing worked.
In turn, VirtualBox attempts to run a virtual machine inside the hypervisor virtual machine. This is problematic because to keep performance fast under virtualization, the CPU exposes hardware a feature to accelerate virtual memory translation and now that feature is used by Windows and it cannot be shared and used by VirtualBox. While the latest version will still run your guest OS (Ubuntu in my case), it will be terribly slow. So slow as to be unusable. Older VBox versions might simply refuse to start the guest OS. This thread is filled with sorrow.
I spent hours pouring over forum threads trying to piece together the puzzle.
How did it suddenly get turned on?
I was confused at first, because I hadn’t changed anything related to Hyper-V or anything of the sort. How then, did it suddenly start being used? As it turns out, I installed Docker which is built on top of this.
Fixing this once and for all
Finding a solution wasn’t easy. Microsoft documents the many security features that virtualization provides and since I use my desktop for work as well, I wanted to make sure that turning it off was safe for me. Many forum posts offer various suggestions on what to do from modifying the registry, to uninstalling various things.
The end goal for me was to be able to stop using the virtualization as it cannot coexist with Ryzen Master and VirtualBox. To do so, you must uninstall every piece of software that requires it. This VirtualBox forum post lists known components that use it:
- Application Guard
- Credential Guard
- Device Guard
-
* Guard
- Containers
- Hyper-V
- Virtual Machine Platform
- Windows Hypervisor Platform
- Windows Sandbox
- Windows Server Containers
- Windows Subsystem for Linux 2 (WSL2) (WSL1 does not enable Hyper-V)
To remove them, press the Windows Key + X -> App and Features -> Programs and Features -> Turn Windows features on or off.
You’ll of course need to uninstall Docker and other similar software.
To figure out if you are using Device Guard and Credential Guard, Microsoft provides this tool. Run it from a PowerShell instance with administrative privileges. Make sure the execution environment is unrestricted as well (as per the readme). And run it with the -Ready switch to see whether or not they are used. Those features might be required by your system administrator if you work in an office or perhaps required by your VPN to connect. In my case, the features weren’t used and as such it was safe for me to remove the virtualization.
Once everything that might require virtualization has been removed, it is time to turn it off. Whether Windows boots inside the virtualized environment or not is determined by the boot loader. See this thread for examples. You can create new bootloader entries if you like but I opted to simply turn it off by executing with administrative privileges in a command prompt: bcdedit /set hypervisorlaunchtype off. If you need to turn it back on, you can execute this: bcdedit /set hypervisorlaunchtype auto.
Simply reboot and you should be good to go!
11 Aug 2020
In my previous blog post, I analyzed over 15000 animations. This offered a number of key insights about what animation data looks like for compression purposes. If you haven’t read it yet, I suggest you do so first as it covers the terminology and basics for this post. I’ll also be using the same datasets as described in the previous post.
As mentioned, most clips are fairly short and the metadata we retain ends up having a disproportionate impact on the memory footprint. This is because long and short clips have the same amount of metadata everything else being equal.
Packing range values
Each animated track has its samples normalized within the full range of motion for each clip. This ends up being stored as a minimum value and a range extent. Both are three full precision 32 bit floats. Reconstructing our original sample is done like this:
sample = (normalized sample * range extent) + range minimum
This is quick and efficient.
Originally, I decided to retain full precision here out of convenience and expediency during the original implementation. But for a while now, I’ve been wondering if perhaps we can quantize the range values as well on fewer bits. In particular, each sample is also normalized a second time within the range of motion of the segment it lies in and those per segment range values are quantized to 8 bits per component. This works great as range values do not need to be all that accurate. In fact, over two years ago I tried to quantize the segment range values on 16 bits instead to see if things would improve (accuracy or memory footprint) and to my surprise, the result was about the same. The larger metadata footprint did allow higher accuracy and fewer bits retained per animated sample but over a large dataset, the two canceled out.
In order to quantize our range values, we must first extract the total range: every sample from every track. This creates a sort of Axis Aligned Bounding Box for rotation, translation, and scale. Ideally we want to treat those separately since by their very nature, their accepted range of values can differ by quite a bit. For translation and scale, things are a bit complicated as some tracks require full precision and the range can be very dynamic from track to track. In order to test out this optimization idea, I opted to try with rotations first. Rotations are much easier to handle since quaternions have their components already normalized within [-1.0, 1.0]. I went ahead and quantized each component to 8 bits with padding to maintain the alignment. Instead of storing 6x float32 (24 bytes), we are storing 8x uint8 (8 bytes). This represents a 3x reduction in size.
Here are the results:
| CMU |
Before |
After |
| Compressed size |
70.61 MB |
70.08 MB |
| Compressed size 50th percentile |
15.35 KB |
15.20 KB |
| Compression ratio |
20.24 : 1 |
20.40 : 1 |
| Max error |
0.0725 cm |
0.0741 cm |
| Track error 99th percentile |
0.0089 cm |
0.0089 cm |
| Error threshold percentile rank (0.01 cm) |
99.86 % |
99.86 % |
| Paragon |
Before |
After |
| Compressed size |
208.04 MB |
205.92 MB |
| Compressed size 50th percentile |
15.83 KB |
15.12 KB |
| Compression ratio |
20.55 : 1 |
20.77 : 1 |
| Max error |
2.8824 cm |
3.5543 cm |
| Track error 99th percentile |
0.0099 cm |
0.0111 cm |
| Error threshold percentile rank (0.01 cm) |
99.04 % |
98.89 % |
| Fortnite |
Before |
After |
| Compressed size |
482.65 MB |
500.95 MB |
| Compressed size 50th percentile |
9.69 KB |
9.65 KB |
| Compression ratio |
36.72 : 1 |
35.38 : 1 |
| Max error |
69.375 cm |
69.375 cm |
| Track error 99th percentile |
0.0316 cm |
0.0319 cm |
| Error threshold percentile rank (0.01 cm) |
97.69 % |
97.62 % |
At first glance, it appears a small net win with CMU and Paragon but then everything goes downhill with Fortnite. Even though all three datasets see a win in the compressed size for 50% of their clips, the end result is a significant net loss for Fortnite. The accuracy is otherwise slightly lower. As I’ve mentioned before, the max error although interesting can be very misleading.
It is clear that for some clips this is a win, but not always nor overall. Due to the added complexity and the small gain for CMU and Paragon, I’ve opted not to enable this optimization nor push further at this time. It requires more nuance to get it right but it is regardless worth revisiting at some point in the future. In particular, I want to wait until I have rewritten how constant tracks are identified. Nearly every animation compression implementation out there that detects constant tracks (ACL included) does so by using a local space error threshold. This means that it ignores the object space error that it contributes to. In turn, this sometimes causes undesirable artifacts in very exotic cases where a track needs to be animated below the threshold where it is detected to be constant. I plan to handle this more holistically by integrating it as part of the global optimization algorithm: a track will be constant for the clip only if it contributes an acceptable error in object space.
Packing constant samples
Building on the previous range packing work, we can also use the same trick to quantize our constant track samples. Here however, 8 bits is too little so I quantized the constant rotation components to 16 bits. Instead of storing 3x float32 (12 bytes) for each constant rotation sample, we’ll be storing 4x uint16 (8 bytes): a 1.33x reduction in size.
Before results contain packed range values as described above.
| CMU |
Before |
After |
| Compressed size |
70.08 MB |
72.54 MB |
| Compressed size 50th percentile |
15.20 KB |
15.72 KB |
| Compression ratio |
20.40 : 1 |
19.70 : 1 |
| Max error |
0.0741 cm |
0.0734 cm |
| Track error 99th percentile |
0.0089 cm |
0.0097 cm |
| Error threshold percentile rank (0.01 cm) |
99.86 % |
99.38 % |
| Paragon |
Before |
After |
| Compressed size |
205.92 MB |
213.17 MB |
| Compressed size 50th percentile |
15.12 KB |
15.43 KB |
| Compression ratio |
20.77 : 1 |
20.06 : 1 |
| Max error |
3.5543 cm |
5.8224 cm |
| Track error 99th percentile |
0.0111 cm |
0.0344 cm |
| Error threshold percentile rank (0.01 cm) |
98.89 % |
96.84 % |
| Fortnite |
Before |
After |
| Compressed size |
500.95 MB |
663.01 MB |
| Compressed size 50th percentile |
9.65 KB |
9.83 KB |
| Compression ratio |
35.38 : 1 |
26.73 : 1 |
| Max error |
69.375 cm |
5537580.0 cm |
| Track error 99th percentile |
0.0319 cm |
0.9272 cm |
| Error threshold percentile rank (0.01 cm) |
97.62 % |
88.53 % |
Even though our clip metadata size does reduce considerably, overall it yields a significant net loss. The reduced accuracy forces animated samples to retain more bits. It seems that lossless compression techniques might work better here although it would still be quite hard since each constant sample is disjoint: there is little redundancy to take advantage of.
With constant rotation tracks, the quaternion W component is dropped just like for animated samples. I also tried to retain the W component with full precision along with the other three. The idea being that if reducing accuracy increases the footprint, would increasing the accuracy reduce it? Sadly, it doesn’t. The memory footprint ended up being marginally higher. It seems like the sweet spot is to drop one of the quaternion components.
Is there any hope left?
Although both of these optimizations turned out to be failures, I thought it best to document them here anyway. With each idea I try, whether it pans out or not I learn more about the domain and I grow wiser.
There still remains opportunities to optimize the clip metadata but they require a bit more engineering to test out. For one, many animation clips will have constant tracks in common. For example, if the same character is animated in many different ways over several animations, each of them might find that many sub-tracks are not animated. In particular, translation is rarely animated but very often constant as it often holds the bind pose. To better optimize these, animation clips must be compressed as a whole in a database of sorts. It gives us the opportunity to identity redundancies across many clips.
In a few weeks I’ll begin implementing animation streaming and to do so I’ll need to create such a database. This will open the door to these kind of optimizations. Stay tuned!
Animation Compression Table of Contents