Morph target animation compression
04 May 2020The Animation Compression Library v1.3 introduced support for compressing animated floating point tracks but it wasn’t until now that I managed to get around to trying it inside the Unreal Engine 4 Plugin. Scalar tracks are used in various ways from animating the Field Of View to animating Inverse Kinematic blend targets. While they have many practical uses in modern video games, they are most commonly used to animate morph targets (aka blend shapes) in facial and cloth animations.
TL;DR: By using the morph target deformation information, we can better control how much precision each blend weight needs while yielding a lower memory footprint.
How do morph targets work?
Morph targets are essentially a set of meshes that get blended together per vertex. It is a way to achieve vertex based animation. Let’s use a simple triangle as an example:
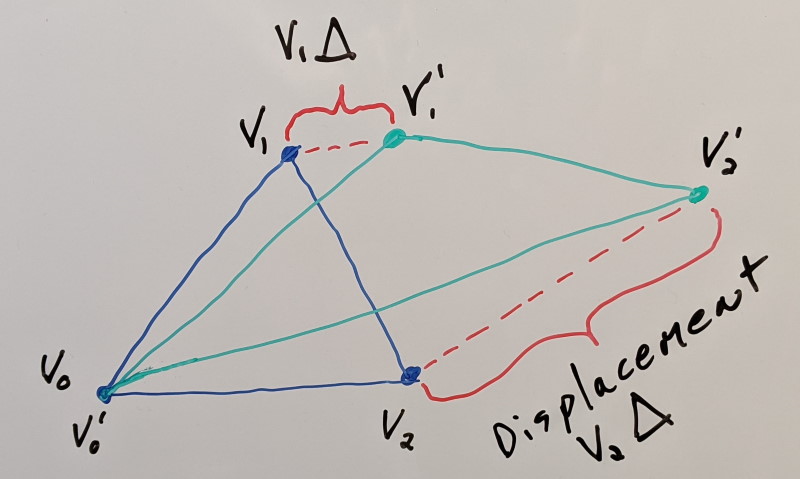
In blue we have our reference mesh and in green our morph target. To animate our vertices, we apply a scaled displacement to every vertex. This scale factor is called the blend weight. Typically it lies between 0.0 (our reference mesh) and 1.0 (our target mesh). Values in between end up being a linear combination of both:
final vertex = reference vertex + (target vertex - reference vertex) * blend weight
Each morph target is thus controlled by a single blend weight and each vertex can end up having a contribution from multiple targets. With our blend weights being independent, we can compress them as a set of floating point curves. This is typically done by specifying a desired level of precision to retain on each curve. However, in practice this can be hard to control: blend weights have no units.
At the time of writing:
- Unreal Engine 4 leaves its curves in a compact raw form (a spline) by default but they can be optionally compressed with various codecs.
- Unity, Lumberyard, and CRYENGINE do not document how they are stored and they do not appear to expose a way to further compress them (as far as I know).
All of this animated data does add up and it can benefit from being compressed. In order to achieve this, the UE4 ACL plugin uses an intuitive technique to control the resulting quality.
Compressing blend weights
Our animated blend weights ultimately yield a mesh deformation. Can we use that information to our advantage? Let’s take a closer look at the math behind morph targets. Here is how each vertex is transformed:
final vertex = reference vertex + (target vertex - reference vertex) * blend weight
As we saw earlier, (target vertex - reference vertex) is the displacement delta to apply to achieve our deformation. Let’s simplify our equation a bit:
final vertex = reference vertex + vertex delta * blend weight
Let’s plug in some displacement numbers with some units and see what happens.
| Reference Position | Target Position | Delta |
|---|---|---|
| 5 cm | 5 cm | 0 cm |
| 5 cm | 5.1 cm | 0.1 cm |
| 5 cm | 50 cm | 45 cm |
Let us assume that at a particular moment in time, our raw blend weight is 0.2. Due to compression, that value will change by the introduction of a small amount of imprecision. Let’s see what happens if our lossy blend weight is 0.22 instead.
| Delta | Delta * Raw Blend Weight | Delta * Lossy Blend Weight | Error |
|---|---|---|---|
| 0 cm | 0 cm | 0 cm | 0 cm |
| 0.1 cm | 0.02 cm | 0.022 cm | 0.002 cm |
| 45 cm | 9 cm | 9.9 cm | 0.9 cm |
From this, we can observe some important facts:
- When our vertex doesn’t move and has no displacement delta, the error introduced doesn’t matter.
- The error introduced is linearly proportional to the displacement delta: when the error is fixed, a small delta will have a small amount of error while a large delta will have a large amount of error.
This means that it is not suitable to set a single precision value (in blend weight space) for all our blend weights. Some morph targets require more precision than others and ideally we would like to take advantage of that fact.
Specifying the amount of precision that a blend weight should have isn’t easy if we don’t know how much deformation it ultimately drives. A better way to specify how much precision we need is by specifying it in meaningful units. If we assume that we want our vertices to have a precision of 0.01 cm instead, how much precision do their blend weights need?
blend weight precision = vertex precision / vertex displacement delta
Notice how the vertex precision and vertex displacement delta units cancel out.
| Delta | Blend Weight Precision |
|---|---|
| 0 cm | Division by zero! |
| 0.1 cm | 0.1 |
| 45 cm | 0.00022 |
When a vertex doesn’t move, it doesn’t matter what precision our blend weight retains since the final vertex position will be identical regardless. However, smaller displacements require less precision while larger displacements require more precision retained.
This is what the ACL plugin does: when a Skeletal Mesh is provided to the compression codec, ACL will use a vertex displacement precision value instead of a generic scalar track precision value. This is intuitive to tune for an artist because the units now have meaning: we can easily find out how much 0.01 cm represents within the context of our 3D model. Underneath the hood, this translates into unique precision requirements tailored to each morph target blend weight curve. This allows ACL to attain an even lower memory footprint while providing a strict guarantee on the visual fidelity of the animated deformations.
A Boy and His Kite
In order to test this out, I used the GDC 2015 demo from Epic: A Boy and His Kite. The demo is available for free on the Unreal Marketplace under the Learning section.
It shows a boy running through a landscape along with his kite. He contains 811 animated curves within each of the 31 animation sequences that comprise the full cinematic. 692 of those curves end up driving morph targets for his facial and clothing deformations. Some of the shots have the camera very close to his face and as such retaining as much quality as possible is critical.
I decided to compare 5 codecs:
- Compressed Rich Curves with an error threshold of 0.0 (default within UE 4.25)
- Compressed Rich Curves with an error threshold of 0.001
- Uniform Sampling
- ACL with a generic precision of 0.001
- ACL with a generic precision of 0.001 and a morph target deformation precision of 0.01 cm
The Compressed Rich Curves and Uniform Sampling codecs are built into UE4 and provide a trade-off between memory and speed. The rich curves will tend to have a lower memory footprint but evaluating them at runtime is slower than when uniform sampling is used.
ACL uses uniform sampling internally for very fast evaluation but it is also much more aggressive with its compression.
| Compressed Size | Compression Rate | |
|---|---|---|
| Compressed Rich Curves 0.0 | 3620.66 KB | 1.0x (baseline) |
| Compressed Rich Curves 0.001 | 1458.77 KB | 2.5x smaller |
| Uniform Sampling | 2052.82 KB | 1.8x smaller |
| ACL 0.001 | 540.24 KB | 6.7x smaller |
| ACL with morph 0.01 cm | 381.10 KB | 9.5x smaller |
I manually inspected the visual fidelity of each codec and everything looked flawless. By leveraging our knowledge of the individual morph target deformations, ACL manages to reduce the memory footprint by an extra 159.14 KB (29%).
The new curve compression will be available shortly in the ACL plugin v0.6 (suitable for UE 4.24) as well as v1.0 (suitable for UE 4.25 and later). The ACL plugin v1.0 isn’t out yet but it will come to the Unreal Marketplace as soon as UE 4.25 is released.